Your group project is due in 48 hours. Your teammate just overwrote your login page with their payment form. The submission window closes in 20 minutes. Sound familiar?
This codelab is not about Git theory, it's about not destroying your project the night before a deadline. By the end of this session, your team will be able to work in parallel, avoid stepping on each other's toes, and submit a working project with confidence.
What you'll learn
- How Git tracks your code like a time machine.
- How to use branches so your team never breaks the main codebase.
- How to handle merge conflicts without panic.
- How to use GitHub to sync code across your whole team.
- A professional Pull Request workflow that scales to any project size.
Prerequisites
- A GitHub account (free).
- Git installed on your machine: check with
git --versionin your terminal. - A terminal / command prompt you're comfortable typing in.
Not installed? Download Git from https://git-scm.com/downloads. It takes 2 minutes.
Before we touch the terminal, let's build the right mental model. Git is not a backup tool, it's a time machine with collaboration superpowers.
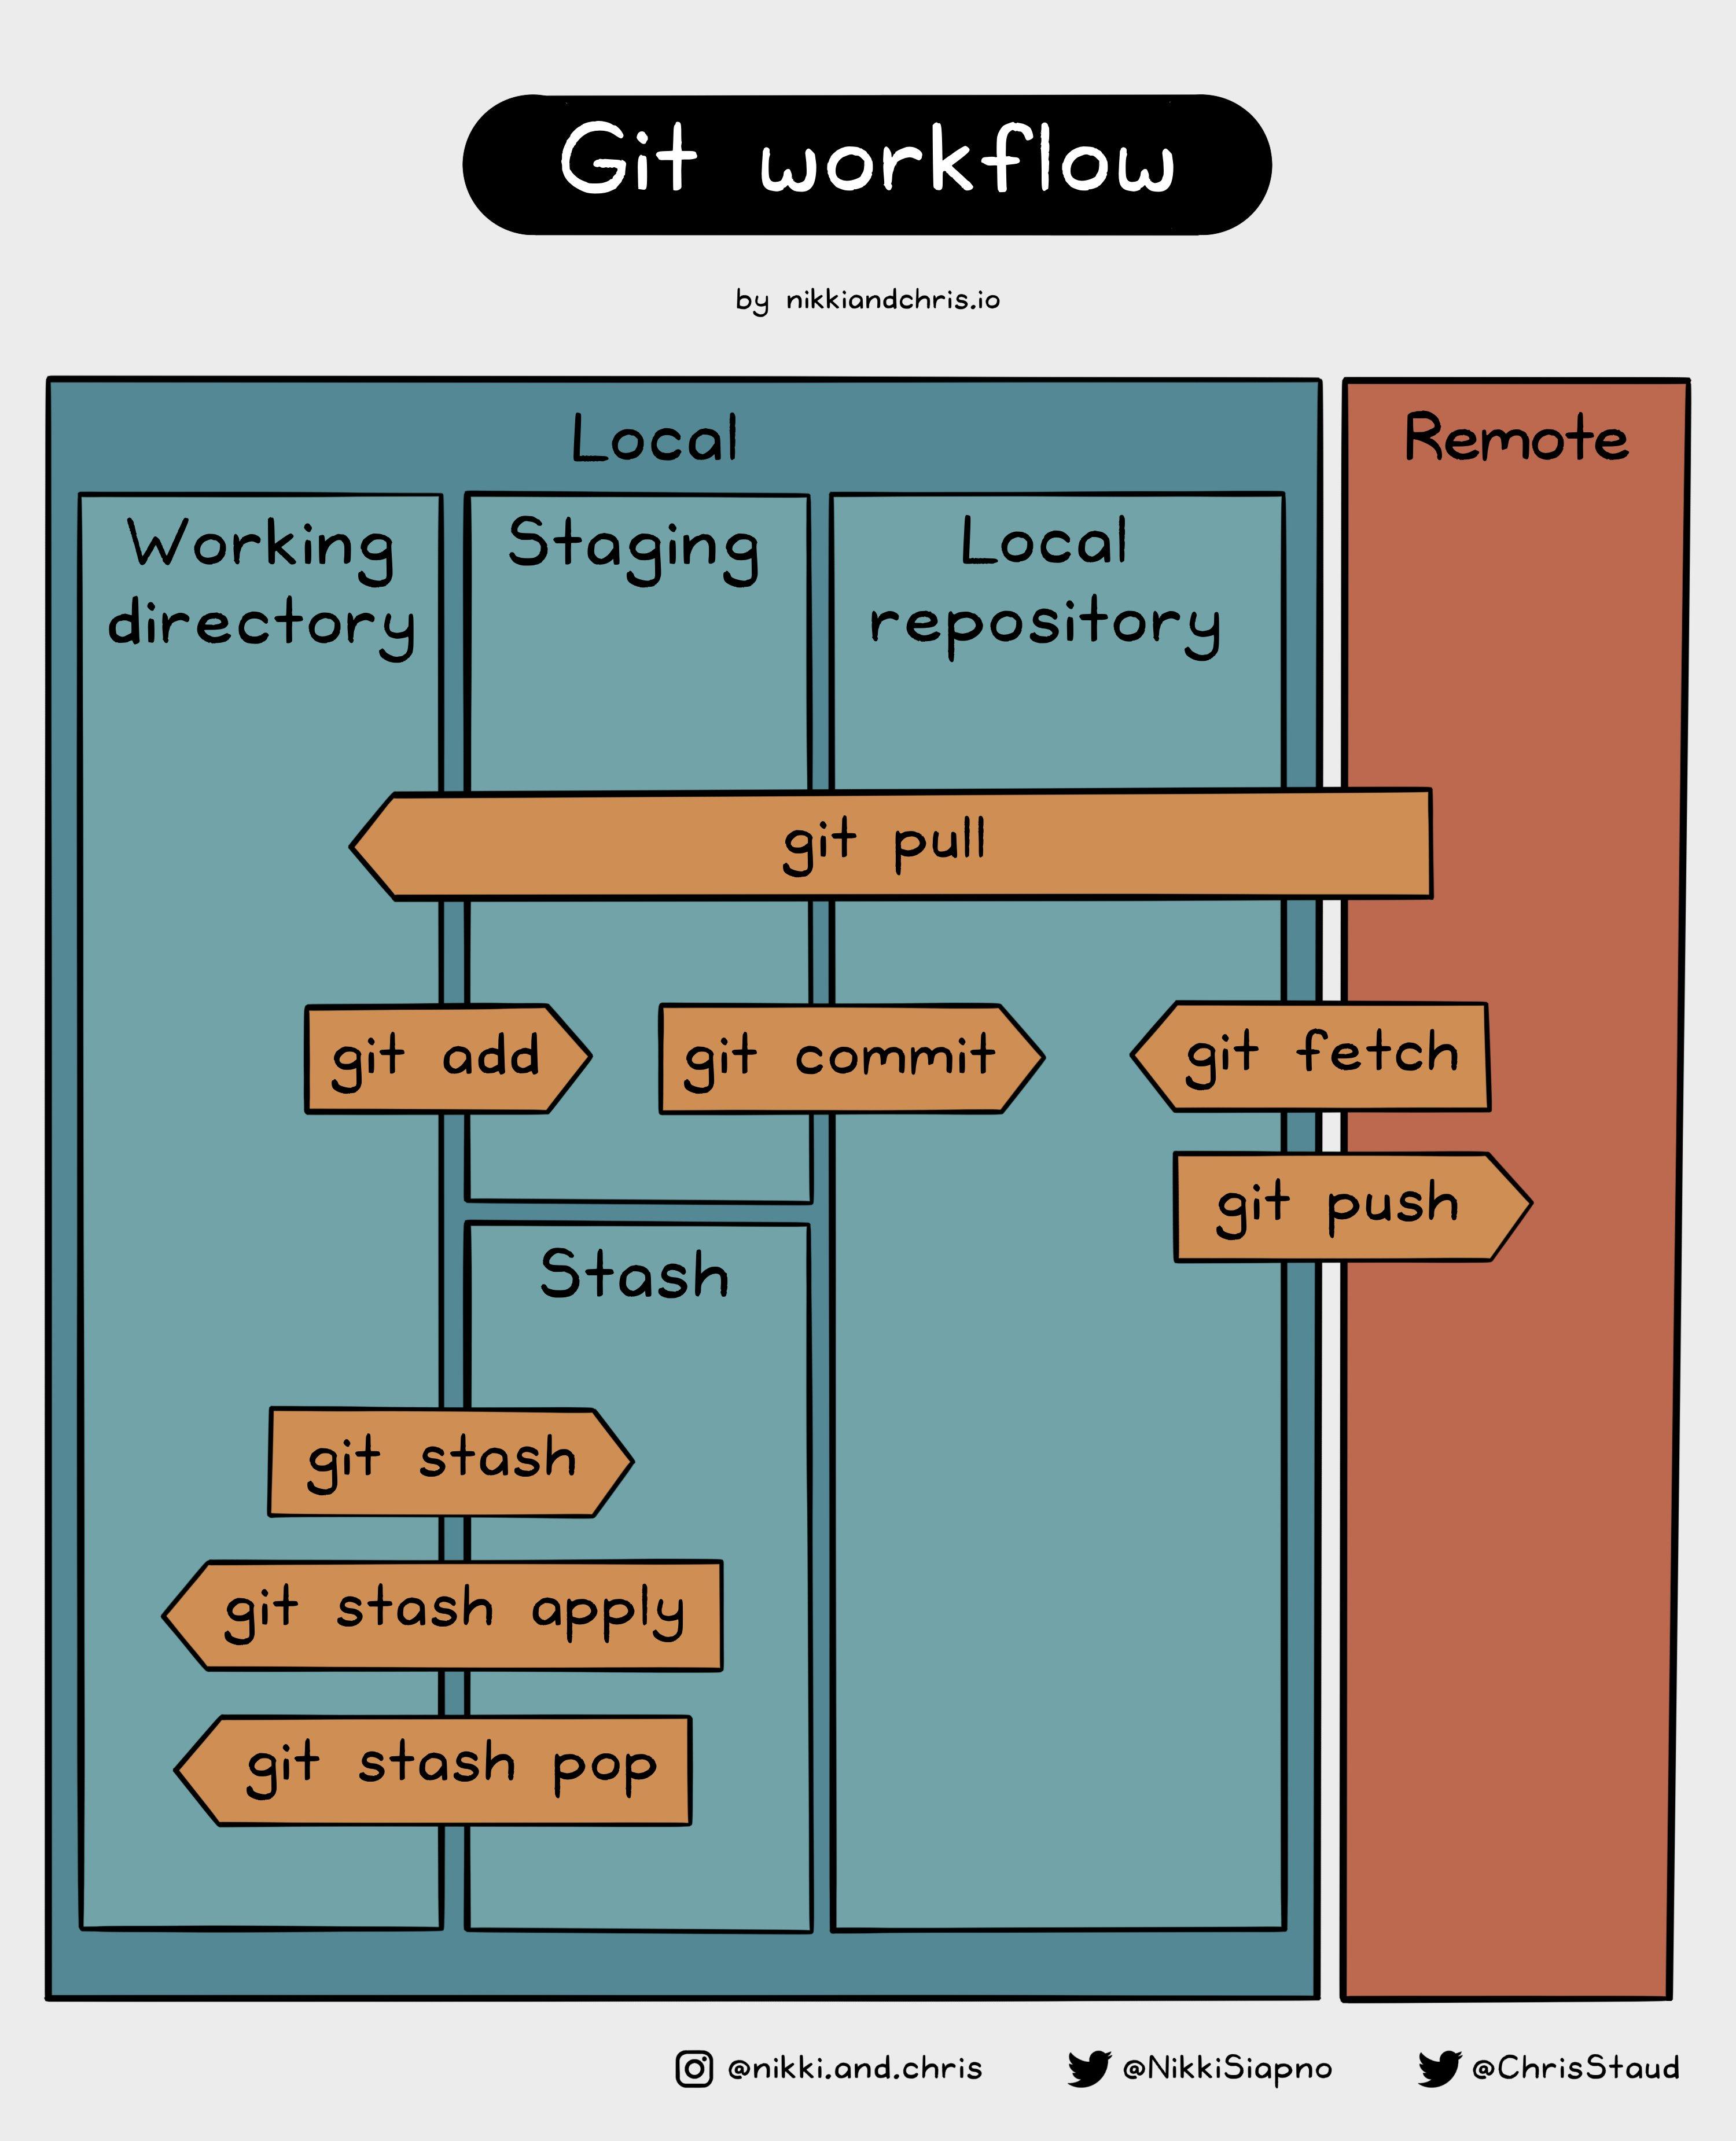
The Three Zones
Every file you work on lives in one of three places at any given moment:
1. Working Directory: Your actual files on disk. This is your messy desk. You can edit freely here.
2. Staging Area (Index): A holding area where you decide which changes to include in your next snapshot. Think of it as packing a box before shipping.
3. Repository (.git folder): The permanent, tamper-proof vault of all your snapshots (called commits). Once something is committed, it's safe.
The Commit: Your Project's Checkpoint
A commit is a snapshot of your project at a specific moment. It records:
- What changed (which lines were added or removed).
- When it happened.
- Who made the change.
- A message describing why you made it.
Good commit messages tell a story. Compare:
❌ Bad | ✅ Good |
|
|
|
|
|
|
Use the prefix convention: feat:, fix:, chore:, docs:, refactor:.
Let's get hands-on. Open your terminal and follow along.
Step 1: Initialize a Local Repo
# Create a new project folder
mkdir group-project
cd group-project

# Tell Git to start tracking this folder
git init

# You should see:
# Initialized empty Git repository in .../group-project/.git/
Step 2: Create a File and Make Your First Commit
# Create a simple file
echo "# My Group Project" > README.md

# Check what Git sees
git status

# Stage the file
git add README.md

# Commit with a meaningful message
git commit -m "docs: initial commit with README"
Step 3: The Status Check Habit
Run git status constantly. Make it a reflex. It tells you:
- Which files have been modified.
- Which files are staged and ready to commit.
- Which files Git doesn't know about yet (untracked).
git status
Configuring Your Identity (One-time Setup)
If this is your first time using Git on this machine, set your name and email:
git config --global user.name "Your Name"
git config --global user.email "[email protected]"
This information gets stamped on every commit you make, so your teammates (and instructors) know who did what.
The Core Workflow Loop
Every feature, every bug fix, every change follows this loop:
# 1. Make your code changes
# 2. Stage what you want to save
git add .                        # Stage everything
git add src/login.py             # Or stage specific files

# 3. Commit with a clear message
git commit -m "feat: add user login validation"

# 4. Repeat
Tip: Commit early and often. Small commits are easy to undo and demonstrate a clear record of individual contributions. A single giant commit submitted the night before a deadline is a red flag.
This is the most important section of this codelab. Branching is what makes team collaboration possible.
The Golden Rule
Never commit directly to
main
during a group project.
main is your submission branch. It should always be in a working, presentable state. All active development happens on separate branches.
How Branches Work
A branch is just a lightweight pointer to a specific commit. Creating one is instant and costs almost nothing.
main:           A --- B --- C
                             \
feature/login:               D --- E
Your teammate works on feature/login while you work on feature/dashboard. Neither of you affects main until you're ready to merge.
Creating and Switching Branches
# See all branches (the * marks your current branch)
git branch

# Create a new branch and switch to it immediately
git checkout -b feature/login-page

# Alternative (modern Git syntax)
git switch -c feature/login-page
Name Your Branches Well
Use a consistent naming pattern so your team knows what's going on:
Branch name | Purpose |
| New feature |
| Bug fix |
| Cleanup / refactoring |
The Branch Workflow in Practice
# 1. Start from an up-to-date main
git checkout main
git pull origin main

# 2. Create your feature branch
git checkout -b feature/payment-form

# 3. Do your work and commit
git add .
git commit -m "feat: add Stripe payment form UI"

# 4. When done, push your branch to GitHub
git push origin feature/payment-form

# 5. Open a Pull Request on GitHub (see next section)
Switching Between Branches
# Save your work first (always commit or stash before switching)
git checkout main          # Switch back to main
git checkout feature/login # Switch to another branch
Warning: If you have uncommitted changes when switching branches, Git will either carry them over or block you. Always commit or stash before switching.
Merge conflicts are not a sign that something went wrong — they're a natural part of collaboration. Git is simply telling you: "Two people edited the same lines. I need a human to decide which version to keep."
When Do Conflicts Happen?
You and your teammate both edited index.html, line 42. One of you changed the button to blue, the other changed it to red. Git can't pick a winner automatically.
What a Conflict Looks Like
When you try to merge and there's a conflict, Git marks the file like this:
<<<<<<< HEAD
<button class="btn-blue">Login</button>
=======
<button class="btn-red">Login</button>
>>>>>>> feature/login
- Everything between
<<<<<<< HEADand=======is your version. - Everything between
=======and>>>>>>>is the incoming version.
How to Resolve It
Step 1: Open the conflicted file in your editor.
Step 2: Decide what the final version should look like. For example:
<button class="btn-primary">Login</button>
Step 3: Delete all the conflict markers (<<<<<<<, =======, >>>>>>>).
Step 4: Stage and commit the resolved file:
git add index.html
git commit -m "fix: resolve merge conflict on login button style"
Prevention is Better Than Cure
- Pull often. Run
git pull origin mainbefore you start working each session. - Keep branches short-lived. Merge feature branches back within a day or two if possible.
- Communicate. Tell your teammate before you edit a shared file.
Tip: Assign clear ownership of files at the start of the project. "You own the backend routes, I own the frontend components." This dramatically reduces conflicts and makes individual contributions easier to attribute.
Git is local (lives on your machine). GitHub is the shared cloud where your whole team syncs.
Creating Your Team's Repository
One person on your team should:
- Go to github.com and click "New repository".
- Name it (e.g.,
cs301-group-project). - Set it to Private (recommended for coursework).
- Do not initialize with a README (you already have one locally).
- Click Create repository.
Connecting Local to Remote
After creating the repo on GitHub, connect your local project:
# Add GitHub as the "origin" remote
git remote add origin https://github.com/YOUR_USERNAME/cs301-group-project.git

# Rename your branch to main (if it's called master)
git branch -M main

# Push your code and set the upstream tracker
git push -u origin main
From now on, a simple git push will send your changes to GitHub.
Inviting Your Team
- Go to your repository on GitHub.
- Click Settings → Collaborators.
- Click Add people and enter your teammates' GitHub usernames.
- They'll receive an email invitation to join.
The Daily Sync Ritual
At the start of every work session, pull the latest changes:
git pull origin main
This brings any changes your teammates pushed since your last session down to your machine.
Cloning the Repo (for teammates)
Teammates who didn't create the repo should clone it:
git clone https://github.com/YOUR_USERNAME/cs301-group-project.git
cd cs301-group-project
This downloads the entire repository including all history.
A Pull Request (PR) is how you propose merging your feature branch into main. Even on a tight deadline, they give a teammate 60 seconds to catch a bug before it ends up in your submission.
Opening a Pull Request
After pushing your branch:
git push origin feature/payment-form
- Go to your repo on GitHub.
- You'll see a banner: "feature/payment-form had recent pushes." Click Compare & pull request.
- Write a short description of what you built.
- Assign a teammate as reviewer.
- Click Create pull request.
Reviewing a PR
Your teammate opens the PR, looks at the Files changed tab, and either:
- Approves it and clicks Merge pull request, or
- Requests changes by leaving a comment.
Keep reviews focused and constructive. The goal is a quick sanity check to ensure the feature works and doesn't break anything else.
After Merging
Once the PR is merged into main, delete the feature branch (GitHub offers a button for this), and update your local main:
git checkout main
git pull origin main
Quick PR Checklist
Before opening a PR, ask yourself:
- Does the code run without errors?
- Did I remove any debug
console.log()orprint()statements? - Is the PR focused on one feature or fix?
- Is the PR title clear?
When things go sideways the night before a submission, stay calm and use these:
Stashing: Temporarily Hide Your Work
Need to pull new changes but your work isn't ready to commit yet?
# Hide your current changes
git stash

# Pull the latest from main
git pull origin main

# Get your hidden changes back
git stash pop
Viewing History
# See a compact log of recent commits
git log --oneline

# See what changed in the last commit
git show HEAD
Undoing Things
# Undo changes to a file (before staging)
git restore index.html

# Unstage a file (keep the changes, just remove from staging)
git restore --staged index.html

# Undo your last commit but keep the changes
git reset --soft HEAD~1
Quick Reference Table
Command | What it does |
| See what's changed (use constantly) |
| See recent commit history |
| Hide uncommitted changes temporarily |
| Restore hidden changes |
| Return to the main branch |
| Get latest changes from GitHub |
| Discard changes to a file |
| List all branches |
Warning: Avoid git push --force unless you fully understand what it does. It can erase your teammates' work permanently.
Here's the complete workflow your team should follow from the moment the project kicks off:
Setup (Do Once, Together)
# Person A: creates the repo on GitHub and pushes initial code
git init
git add .
git commit -m "chore: project setup"
git remote add origin https://github.com/team/repo.git
git push -u origin main

# Persons B, C, D: clone the repo
git clone https://github.com/team/repo.git
Every Feature (Repeat Throughout the Project)
# 1. Start fresh from main
git checkout main
git pull origin main

# 2. Create your feature branch
git checkout -b feature/your-feature-name

# 3. Build and commit as you go
git add .
git commit -m "feat: describe what you built"

# 4. Push and open a PR
git push origin feature/your-feature-name
# → Open PR on GitHub → teammate reviews → merge

# 5. Clean up and sync
git checkout main
git pull origin main
Divide and Conquer
At the start of the project, split your codebase by ownership:
Person | Owns |
Frontend Dev |
|
Backend Dev |
|
Full Stack |
|
This reduces the chance of merge conflicts dramatically and makes it straightforward for each member to demonstrate their individual contributions.
You now have everything you need to collaborate like a professional engineering team, even under tight deadlines.
What we've covered
- Git's three zones: Working Directory, Staging Area, and Repository.
- Making meaningful commits with clear messages.
- Branching to keep
mainsafe and stable at all times. - Resolving merge conflicts with confidence.
- Connecting your local repo to GitHub and syncing as a team.
- Using Pull Requests for fast, lightweight code review.
- Emergency commands to recover from any situation.
The Three Rules to Remember
- Commit often. Small checkpoints save you from big disasters and build a clear record of your work.
- Branch always. Every feature, every fix must be its own branch.
- Pull before you push. Always sync before you start working.
Now go build something great. Good luck!